Asahi Nordic Certified Instructor – A Health Exercise from Finland

Finnish Roots

In July 2023, I had the privilege to attended FinnFest 2023, and complete my Asahi Nordic Level-C Asahi certification. What is Asahi? It’s a health exercise method that was developed in Finland in 2004, and I came upon it online one day and my interest was immediately peaked. You see, my mother’s parents, Elmer and Maj-lis, immigrated to the United States from Finland in 1959. My mother, 100% Finnish along with both of them, and myself 50%. Growing up, I felt deep ties to my Finnish heritage and Scandinavian roots, but hadn’t spent too much time exploring on my own. In my grandparents home I was surrounded by beautiful wall hangings, rag rugs, Finnish foods, and prayers and phrases that we would say when spending time with them.

Movement throughout my life

I’ve been in the movement space my whole life, dancing since age three, playing soccer since age nine, working out since age twelve, taking Pilates since age thirteen, and exploring so many various movement modalities with great curiosity. I started teaching dance at age fifteen, and started my Pilates teaching journey at age twenty. My favorite thing about movement is my belief that movement is for everyone! Finding ways to make movement accessible to the largest amount of people feels like a noble calling for me. This is one of the main reasons I got drawn into the world of Pilates. It’s ability to help so many populations with its equipment to safely move and build strength in their bodies. To regain confidence in their identities as movers.

In over a decade of Pilates instruction I’ve worked with students ages six through late eighties, all with different goals and strengths. I’ve served students with neurological conditions, joint replacements, arthritis of all kinds, mental disorders, cancer, pre-operative, post-operative, pregnancy, spinal conditions, athletes, dancers, low self-esteem, caretakers, doctors, business owners, parents, grieving, soon-to-be-wed, and everything between. I always would make the joke that I’ve certainly heard of every single health condition and diagnosis at this point, but then the next week I’d have a new student with a new condition walk in the doors.

Asahi is for All!

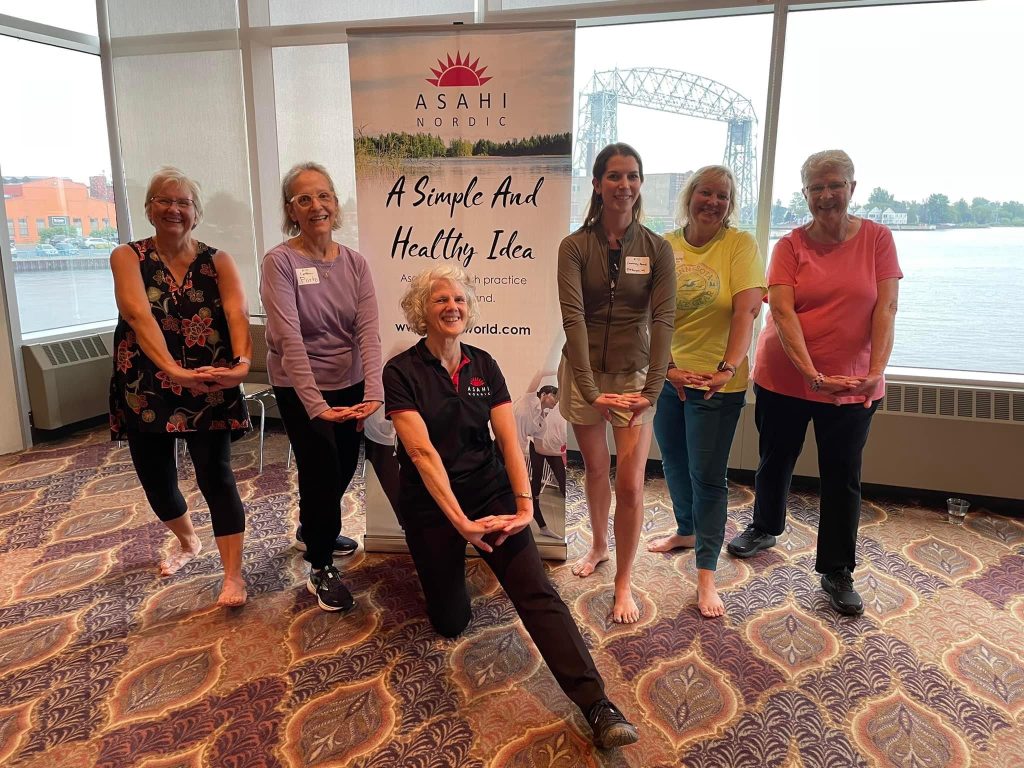
When I first read up about Asahi I was most excited at its accessiblity for all. No equipment is required, its ease of learning with no experience needed to pick it up, its focus on breath as central, the mind-body connection it promotes, and the ability to perform it outside. Being able to workout and move outside has become a high value in my life, and I believe provides a deeper connection of self to the world around us. The word Asahi is actually a Japanese word that means “morning sun,” and this practice was named as such to signify the energy we can get through both exercise and spending time outdoors. The book Asahi – The Nordic Health Practice shares “the movements of Asahi are basically relaxing and are designed to gently increase muscle stamina, balance, coordination and concentration.”

More Movement, Varied Movement, Daily.

-Courtney Anne Holcomb, CaH

One of my mottos and charges is to encourage more movement, varied movement, daily. Asahi fit the bill perfectly for this. From beginning to end, you can easily practice the sequence daily in 10-15 minutes depending on how many repetitions of each exercise you perform. I learned two Asahi series: Asahi #1 and Asahi #2. Each series has the same four sections: relaxation, neck and shoulders, back, and balance. Each section is comprised of three total exercises. So all in all, a single series has 12 exercises that are performed in sequence, with a breathing exercise to start and end each section. Though all can benefit from doing Asahi, the number one population that I believe this benefits is the aging population. The exercises were developed by exercise and geriatic specialists to ensure that risk of injury is super low and the outcome of benefits of performing the exercises is extremely high.

Sharing Asahi with others

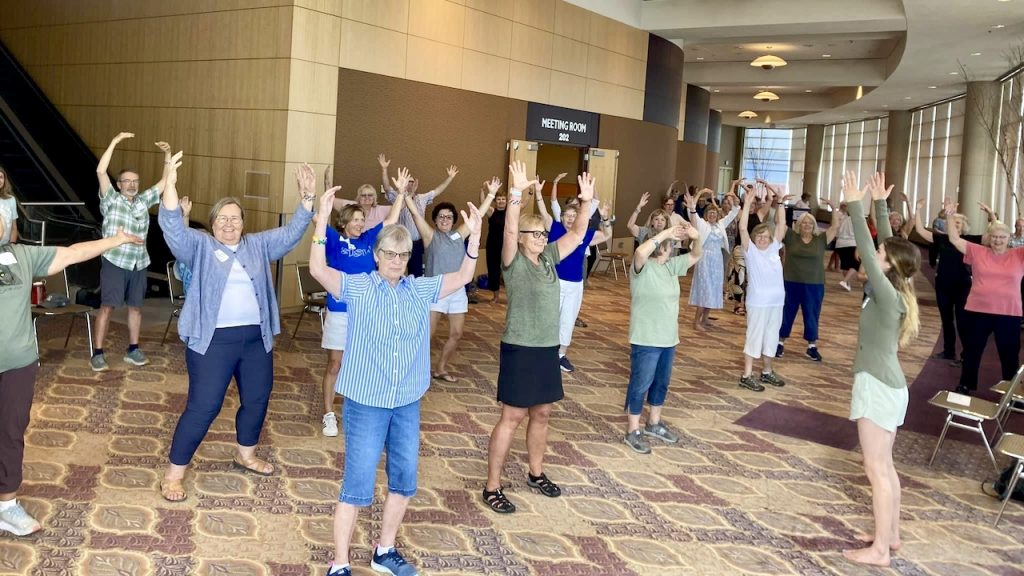
At the workshop we led at the conclusion of our training, we had close to 100 participants join us for Asahi (see photos below). Everyone was able to do it. We had participants in wheel chairs, with walkers, people in their 90s, children of elementary age, and everything between. Staring out at the crowd of people all gathered to move together made my eyes glisten. This is what movement can do, it literally can move people.

I’m excited to see what doors having my Asahi Nordic certification will open. I am currently one of around thirty instructors certified in the United States. Being at the forefront of this training is an exciting way for me to connect to modern Finnish heritage and carry my roots along with me. For more information on Asahi, visit their website. If you’d like to host me to teach a class or know of places and spaces that Asahi might be a good fit, I’d love to hear from you: courtney.anne.holcomb@gmail.com

-Courtney Anne Holcomb, Asahi Nordic Certified Instructor, C-licence, Sheboygan, WI

Moving in All Directions with Move and Yield**

Four Pilates Exercises for a Healthy Spine

**Adapted from a featured article in Appleton Monthly Magazine April 2018 “Healthy You” Edition.

Joseph Pilates, creator of the Pilates Method of fitness once said, “a man is as young as his spinal column. If your spine is inflexibly stiff at 30, you are old. If it is completely flexible at 60, you are young.” We spend most of our days sitting, slouching forward, and rarely moving our spines at all, and it’s taking a toll on our bodies—and our posture.

Pilates helps to move the spine in all directions which creates resiliency and flexibility that will keep your body feeling young through your years.

Try these four Pilates exercises to increase your spinal mobility and eliminate stiffness after a long period of sitting. Each one of these exercises moves the spine in a different direction: flexion, roation, side bending, and extension.

As always, make sure you consult your doctor or primary care provider before starting a new exercise program to ensure you are cleared for movement.

Spine Stretch Forward

Set-up:  Sit up tall on your hips with the legs straight and shoulder-width apart.  Flex your ankles and reach your arms forward at shoulder height.

Exercise:  Inhale, and pull your abs in as you slide the shoulder blades forward.  Reach and round through the spine as if you were bending over a fitness ball.  Exhale, draw the shoulder blades back down your back as you roll to sit up tall on your hips.  Repeat 6-8 times. In order to feel the stretch through your back, you must engage your core through the front. Really feel the abdominal wall pulling in and back to maximize the stretch through the backline of your body.

*Pro Tips: Think about elongating the spine forward, rather than “crunching” it forward. How much reach can you feel through the crown of your head?  This exercise stretches the mid and upper back, so keep your hips anchored throughout the exercise (the pressure on the base of the pelvis should not change at all as you perform the movement).

Modification:  If you are unable to sit-up all on your hips, place a soft bend in the knees so you can sit perpendicular to the ground, or prop yourself up on a pillow or book.

Modified Corkscrew

Set-up:  Lay on your back with arms at your side, and extend your legs up to the ceiling at hip-height.  Point through your ankles and actively hold your legs together.

Exercise:  Inhale, swing both legs to the right, allowing the left hip to lift up and off the mat. Continue circling the legs down towards the ground while stabilizing both sides of the pelvic. Exhale, lift the legs back up towards the ceiling allowing the right hip to leave the mat, and return the legs to the starting position.  Reverse the exercise by beginning to the left. Repeat 3-6 times each direction.

*Pro tips: Only let the legs lower toward the ground as much as you can without arching the low back.  Feel for the subtle rotation of the low back as the hip lifts off the mat, keeping the hips level, the hip is lifting, but not hiking towards the ribcage.

Modification:  For more support, allow the arms to be out in a “T” with the palms facing down, or keep the legs bent at a 90 degree angle while performing the exercise.

Side Leg Bananas

Set-up: Lay on your side with your head, shoulders, hips, and heels all in one straight line.  Rest your head on your bicep with your palm facing towards the ceiling. Place your opposite hand palm facing down in front of your chest.

Exercise:  Take an inhale to prepare for the movement. On the exhale, engage your core and lift both legs up and off of the mat.  Feel your top hip move towards your ribcage. Inhale to lower back down, and on the next exhale, keep your legs down and lift your upper body off the mat all the way to the bottom of the shoulder blade using your waistline.  Lower back down and try lifting both upper and lower together on your next exhale. Repeat the whole sequence (lower, upper, both) 2-3 times, then switch to lie on the other side and repeat.

*Pro tips:  Keep the body in one long line from fingers to toes.  Think about pressing your waistline down into the mat to help you stabilize as you lift.

Modification:  Turn the palm of the arm overhead to face the ground and press into it while lifting just the head and legs off of the mat.

Swan

Set-up:  Lay on your stomach with the palms facing down right below your shoulders, elbows pointing up.  Legs long behind you in parallel as close together as is comfortable for your low back, kneecaps facing the ground.

Exercise:  Inhale and engage the abs and press into your palms.  Exhale, and slowly begin peeling the spine up and off the mat one vertebra at a time.  Keep the shoulders gliding down your back, and lift only as high as you comfortably can.  Try to feel for even extension through the spine, head is in line with the spine. Inhale at the top, and exhale to slowly lower the spine back down to the mat with control.  Repeat 4-6 times.

*Pro tips:  Keep the low back long and feel for a stretch through the front of your hips.  As you lower back down to the mat, imagine the spine is pressing through the chest to stretch it longer as you lower down.  Try to maintain the shoulders neutral and wide across your back throughout the exercise.

Modification:  Place your hands level with your ears, and only rise as up to your elbows.  Focus on anchoring the pubic bone into the mat the keep the pressure off of your low back.

The Ultimate Ab Workout – The Pilates Series of Five

Are you looking for an ab series that is quick and effective? Time to try the Pilates Series of Five.  This popular Pilates sequence is sure to get you feeling your abdominals and working the core!  Best part? It only takes 2 minutes to complete from start to finish.

The basic series includes these five exercises:

  1. 1) Single Leg Stretch
  2. 2) Double Leg Stretch
  3. 3) Single Straight Leg Stretch
  4. 4) Double Straight Leg Stretch
  5. 5) Criss-Cross

This series helps build the support structure that keeps us standing upright with our best posture and presenting our best selves forward. The core, also often referred to as “the powerhouse”, is always a great place to access inner strength to aid our extremities (arms and legs) which helps us preserve energy for things like a long walk, hike, or a day out running errands.

Parts of the Core

The core is comprised of four key components, the most famous or often spoken of, the rectus abdominis, is our most superficial layer. It’s often referred to as “the 6-pack muscle”, and its main job is forward flexion of the spine. But this is not the only part of our core. The external obliques and internal obliques are the next deepest layers that aid in rotation and flexion. But the final and most powerful layer that assists with our strength and posture is the deepest layer, the transverse abdominis. This muscle is our key core stabilizing muscle that wraps around us like an inner tube and helps hug the core inward, helps with upright posture, and most importantly stablizes the thoracic cavity and pelvis. Without using this muscle well it’s difficult for the body to perform efficient movement patterns. And without efficiency we have unnecessary energy expenditure. And I don’t know about you, but time and energy are precious to me…so if there are ways for me to be more efficient, I am all for it. The beauty of the “Series of Five” is that together these five exercises target all of the various components that make up our full core.

The Series of Five

Ultimately we want to work up to being able to perform each exercise for ten repetitions before moving to the next. And from start to finish, trying to make it through each set without stopping or lowering the head. But with all things in life, it’s best to work your way up to that level of strength and endurance. Start with trying to do each exercise just four times, and work up from there until you find yourself performing ten of each with ease.

The videos below will show two repetitions of each exercise.

1) Single Leg Stretch

Keep the pelvis stable and lift the head and shoulders off the mat.  Left hand to your right shin, right hand to your right ankle. Inhale as you hug the right shin in with wide elbows. The opposite leg shoots out long at a high diagonal.  Inhale again to change legs.  Then exhale twice as you exchange from right to left again. Right and left counts as one rep. 

Then draw both legs into the chest to transition into…

2) Double Leg Stretch

Begin with both shins hugged into the chest. Inhale as you extend and reach the arms high overhead (without lowering the shoulders) and send the legs out long to the high diagonal.  Exhale as you brace the core in deeper and circle the arms to gather the shins back into center. 

Extend the right leg long towards the ceiling and grab behind the thigh or calf. Lower the left leg towards the mat…

3) Single Straight Leg Stretch

Tug the right leg towards you as the left leg moves down. Take two quick breaths in through the nose as you “tug” the leg.  Pulse twice in this position. Hold the crunch in your upper body as you switch legs and exhale through the mouth.  Keep the knees straight and work for a smooth transition from side to side. Right and left counts as one rep. 

Draw both legs together and press them into one another. Support your hands behind your head and extend the legs up towards the ceiling…

4) Double Straight Leg Stretch

Inhale to lower both legs down to hover above the mat as you point through you ankles. Try for as low as you can without arching the low back. Exhale flex your feet to reach energy long through your heels and hug the abdominal muscles in towards the spine as you lift the legs back up to the ceiling. Maintain the shoulder blades hovering off the mat throughout.

To transition, draw the right knee in and extend the left leg out to the low diagonal…

5) Criss-cross

Upper body is lifted with hands behind your head, then rotate to bring the left shoulder towards the right knee with an inhale. Inhale again to bring the right shoulder blade towards the left knee, maintaining the lift of the torso through center as you change sides and legs.  Then exhale for two actions (right and left). Right and left is one rep.

To finish, draw both legs into your chest and lower the head, neck, and shoulders to the mat.  Turn your head to the right and let both knees fall left, then switch head to the left knees fall right.

Tips for Good Technique

  • Keep the torso and hips stable throughout the whole series
  • Pelvis maintains neutral throughout meaning that your front hip bones and pubic bone remain parallel to the ground
  • Legs should only lower towards the mat as much as you can without arching the low back
  • Don’t rush it! Enjoy slow, fluid movements to get the most impact
  • Pull the abdominal muscles in towards the spine instead of letting them press out
  • Each exhale allows you to pull the stomach muscles in deeper
  • Keep shoulders wide throughout the exercises, and all arm pulling actions are assisted from your lats
  • When hands are behind your head, they are supporting the weight of your skull, not pulling on the neck. Let your head rest heavy in the basket of your hands, and your spine flexing forward is what produces your forward flexion and abdominal curve
  • Start with just a few repetitions of each exercise and work up to the full series
  • Take breaks between each exercise as needed until you build up strength and endurance

I hope you enjoy this sequence and find it as a helpful tool for your movement practice. If you have any questions, feel free to reach out to me at courtney.anne.holcomb@gmail.com or if you’re interested in doing one-on-one training to practice, I train students virtually and sessions can be booked on my booking site.

Follow the movement! on Instagram @courtneyannemoves and Facebook

LAUNCHING: Dance Bright Workshop Series

Over the years I have worked with hundreds of dancers on both technique, choreography, and conditioning. I’ve said a lot of the same corrections over the years, seen a lot of the same injuries, and witnessed the gap in traditional dance training to teach the HOW TO of many corrections. The purpose of a dance class is to keep the class moving, which means there is not always time for teachers to break down body mechanics and explain the corrections they may be giving. That is why I’ve designed the Dance Bright Workshop Series.

Dance Bright is a workshop series that focuses on movement education and intelligent strength and conditioning specifically for dancers. The purpose of Dance Bright is to help dancers improve their body awareness, better understand their anatomy and alignment, and learn about proper muscle recruitment and release techniques.  These workshops dig deeper into specific concepts and corrections that come up often in dance classes, but that a dance class setting doesn’t always have time to fully explain or explore.  Dance Bright will help close the gap between what dancers are told they should be doing, and how they can do it.

Workshops are 2 hours and 15 minutes in length and combine an element of lecture, movement exploration, strengthening, and stretching.  The series is designed for dancers ages 12-adult.

Join us for our first workshop in the Dance Bright series, “Understanding our Hips and Core”, Wednesday, August 21st, 1:15-3:30 PM, located at Waveforms Pilates, 210 S. Commercial Street, Neenah, WI.

This workshop explores pelvic placement/alignment, proper core function and use, strengthening strategies for our hip stabilizers, as well as release techniques for tightness in the hip area. Through a combination of lecture, movement exploration, strengthening, and stretching, students will leave with an understanding of how to align and stabilize their hips to support the dynamic movements required while dancing.

Cost of workshop is $59 and includes a pinky ball and Franklin air ball for dancers to take home with them to incorporate the exercises and stretching strategies they learn at the workshop.

Pre-registration and payment is required by August 12th, 2019. Seats are limited! To reserve your seat or for question, reach out to Courtney Holcomb via phone (920) 740-3085 or e-mail to info@waveformspilates.com

The Dance Bright Workshop Series was designed by Courtney Anne Holcomb.  She is a professional dancer, choreographer, PMA®-Certified Pilates Trainer, and owner of Waveforms Pilates in Neenah, WI.  She received a BA in Dance, and brings over 15 years of dance and fitness instruction, 9+ years of Pilates training, and professional performance credentials.  She’s worked with dancers ages 2.5-adult to help improve their technique, alignment, confidence, and expression through movement.

Find the event on Facebook!